I found this video through another blog that I follow. Dear Baby has quickly become one of my favorites! This morning Melissa linked to another blog that had posted this video and I then spent the next 4 minutes crying like a very hormonal pregnant woman who is finally realizing, this baby is coming and coming soon.....and I can't wait to meet the Lil Turkey!
Thursday, October 7, 2010
Wednesday, September 15, 2010
Cloth Diapers.....first step to hippyville
Let me start by saying, yes I am actually writing a blog post....sweet holy moly, what has the world come to. I am inspired by and use Alyce's blog as a gauge when it comes to my pregnancy. I also use all of her research (thanks Al!) as a jumping off point when it comes to researching for the Lil' Turkey. Call it a hunch, but I think baby fever has run rampant among our friends and I figured I should put my research down so those who are so inclined can use it.
First up on our journey of all things baby......Cloth Diapers!
Alyce did a fabulous job of explaining the different diapering options so I'm going to skip that and refer you to her post.
I just intend on sharing what we chose, why we chose it and my plans for execution. We started by going to a cloth diapering class at The Little Seedling in Ann Arbor and narrowed it down to pocket diapers.
Pros -
- very similiar to disposable diapers for those that putting the diaper on. I thought this would be helpful if we had any skeptics that would be changing this child's bum.
- friggin adorable options in terms of colors and patterns
- easy to wash and durable. ie: one set will get us through multiple children
Cons -
- cost more than prefolds
- can be harder to get a snug fit which could lead to leaks
The pocket diapers have 2 major brands, Bumgenius and Fuzzi Bunz. They also come in sized or one size. The one size is adjustable and in theory gets you from newborn to potty training in one diaper. The downside to this is if you want to use these diapers for multiple children you will likely have to replace your stash since they will get worn out with the first kid. Because of this, we decided to go with the sized option which led us to choose Fuzzi Bunz.
Next question - how many diapers do you need? We (I) have decided to wash the diapers at home rather than go through a service. Part of the reason we are cloth diapering is because I'm a bit of a cheap-0 and the cost of disposables makes me ill. I've also learned that washing cloth diapers is way easy and I was sold.
You need to wash diapers once every 1-2 days and a newborn goes through 10-12 diapers each day. Do the math and you're looking at 24ish diapers. I threw in a few extras for good measure and decided I want 30 diapers for the newborn stage. Once the baby gets a little older you only go through 7-8 diapers a day. Again, do the math and you're looking at 20ish diapers for the next stage. I decided to go with the extra smalls and the smalls to start. I figure if the baby needs to go to the mediums, I'll deal with that when the time comes (which wouldn't be for at least a year). The extra smalls are for babies 4-12lbs and the smalls are for 7-18lbs. In theory, if you have a big baby you may not need the extra smalls but after seeing the smalls in person, they looked a little bulky for a brand new baby.
These diapers cost between 16.00-18.00 per diaper which can get crazy expensive. I started looking on ebay and diaperswappers for cheaper alternatives. I found a lot of people selling used diapers and I haven't made a final decision on my feelings for used diapers so I didn't purchase those. Some say, you wash the diaper and at the end of the day all baby poop is the same so what's the difference. Others, don't agree. To each their own. Anyway, I was able to find someone selling 30 size small Fuzzi Bunz in various colors (gender neutral - bonus!) for $250.00 which included shipping! These were brand new, never used and I snatched them up! I am currently working on getting 13 size extra small, brand new diapers on diaperswappers for about $10.00 per diaper. Point of my rambling - don't let the cost scare you. You can find them cheaper.
Onto washing - we have a top loading, high efficiency washer which means you have to do some tweaking when it comes to washing. Cloth diapers require a lot of water to make sure all the detergent rinses out. If it doesn't, it can create a barrier to your diaper which will cause absorbency issues. Also, you have to be careful about the detergent you use since even the "Free and Clears" at the store have whitening agents and other chemicals that can cause buildup. After researching, we decided to go with Allen's Naturally but there are plenty of other options. It is kinda pricy ($46.00 for a gallon) but you use literally 2 tsp per load so a gallon will last years!
Now let's pretend the Turkey is here and we are cloth diapering. You take the diaper off like any other disposable. Pull out the liner from inside the diaper. As long as Turkey is exclusively breastfed, the diaper does not need to be rinsed. The poo is water soluable and will wash away in the machine. Once food is introduced you will need to rinse the poo off in the toilet with a diaper sprayer (basically a sink sprayer attached to your toilet). Toss the diaper into the diaper pail (ie: garbage can with reusable pail liner) and put a new diaper on.
Wash day - take the pail liner and it's contents and dump it all into the washing machine. I have a rinse and spin setting on my washer and I use that with cold water. Point is - do a cold rinse. Next, do a regular wash with warm/cold or cold/cold water and your tiny amount of detergent. Finish with a cold rinse.
You can tumble dry the diapers but you never want to use high heat! The best method is to line dry them as the sun bleaches out any stains but seeing as this kid is coming in the winter, we won't be doing that right away.
Plop your butt on the couch and put the liners back in the diapers and put 'em away.
Now some pictures to reward you for actually reading this far.....
The outside of the diaper. The snaps allow for some degree of size adjustment
 The liner and where you stick the liner
The cushy cozy fleecy inside

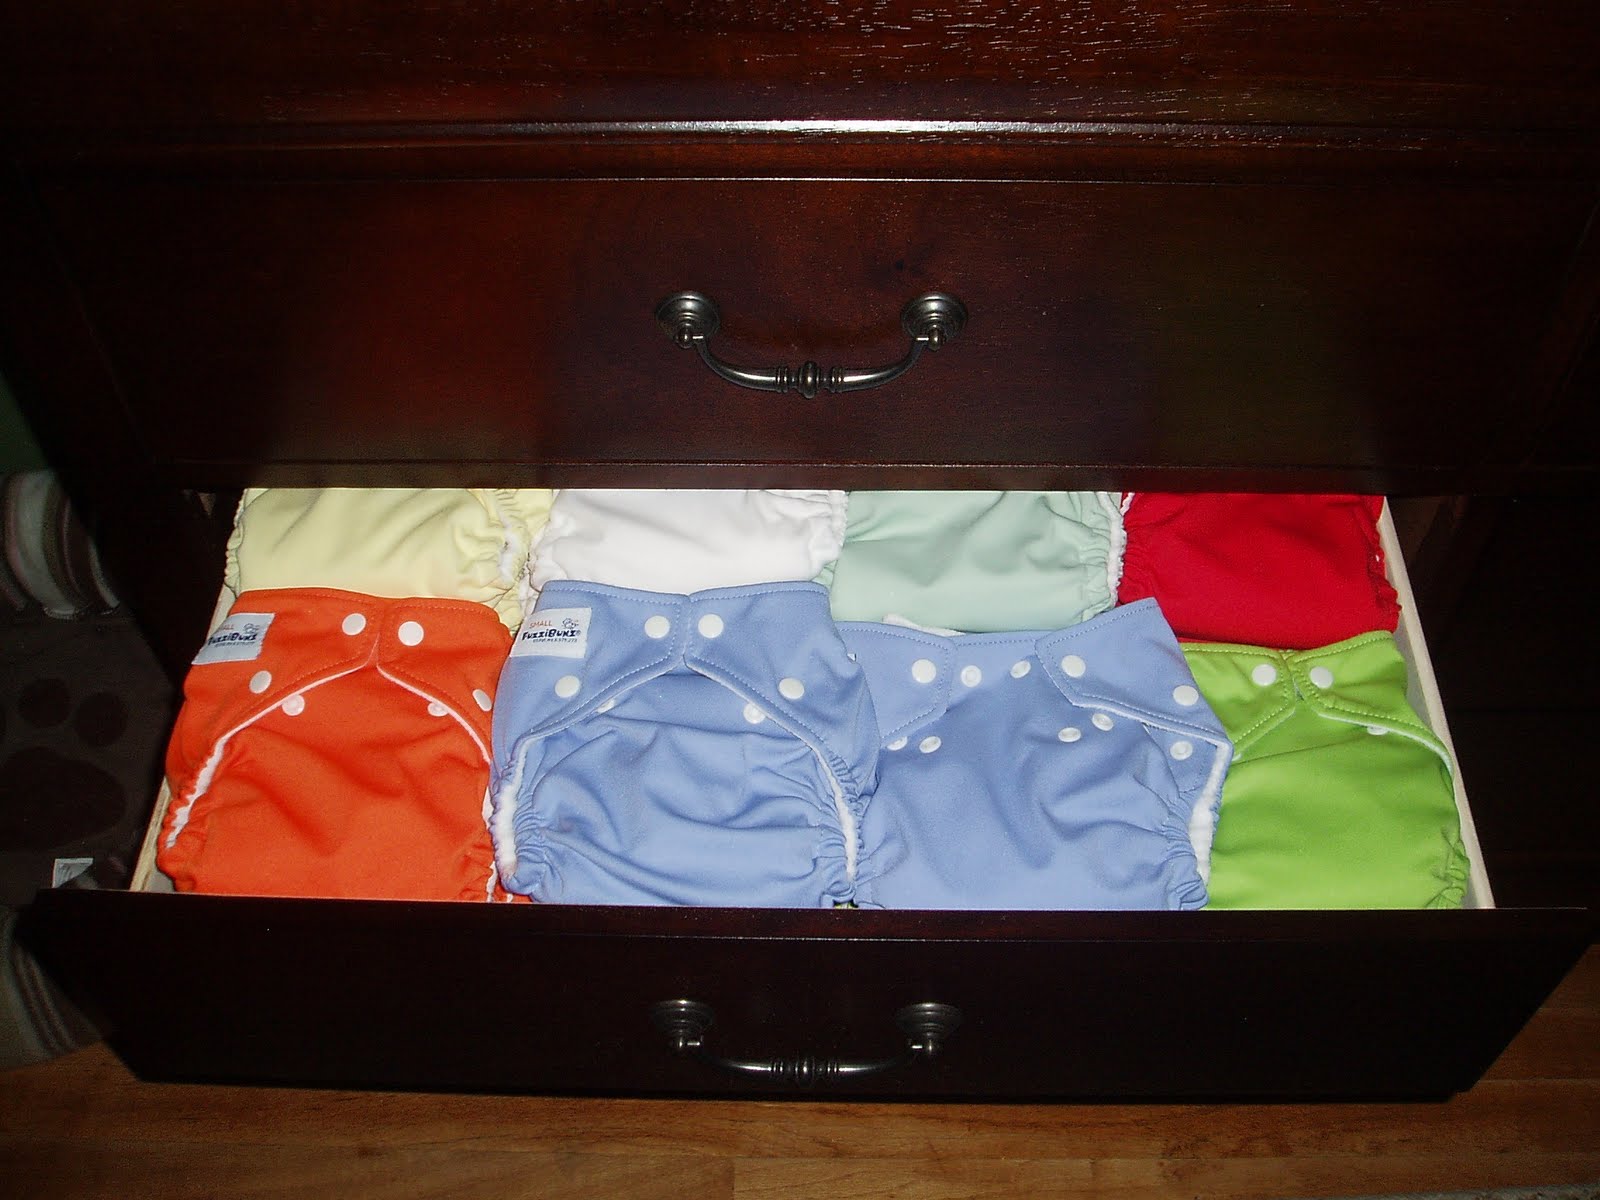
My stash of adorable freakin' diapers! I love all the colors!
Friday, January 1, 2010
Ann Arbor Restaurant Week
 It's heeeerrreeeee!
Lunch - $12 and Dinner - $25
Some of the restaurants are offering 2 for 1 specials!
Check it out HERE
The best deals I've found are:
ABC - 2 for 25 dinner
Palio - 2 for 25 dinner
Chop House - 25 each dinner but one of the entree options is the filet
Melting Pot - 25 each dinner. I've never been but I undestand you can easily spend over $100 for 2. This one includes a cheese fondue app, a pretty mixed entree fondue and the chocolate fondue dessert!
Friday, December 18, 2009
12 Days of Cookies - Day 1 - Gingerbread Cookies
These made an appearance at Georgette and Chuck's Christmas gathering. It was here that I was endlessly ridiculed and tormented for my couponing.....I'm planning a get even post....stay tuned.

- cold dough is key - less likely to stick to the rolling pin
other than that it was a pretty basic recipe. and yummy!

Ingredients
1 1/2 sticks lightly salted butter, softened
1 2/3 cups sugar
1 orange, zested
The dry ingredients:
4 cups all-purpose flour, plus 1/2 cup additional for rolling, if needed
1 1/2 teaspoons baking powder
1/2 teaspoon baking soda
1 tablespoon ground dry ginger
1/2 teaspoon ground nutmeg
1/2 teaspoon ground allspice
2 teaspoons ground cinnamon
1/4 teaspoon ground cloves
1/2 teaspoon kosher salt
2 eggs
1/2 cup dark molasses
1 lemon, juiced
Easy Orange Frosting, recipe follows
Instructions
In the bowl of an electric mixer fitted with a paddle, add the butter, sugar and orange zest and beat until smooth, 5 to 8 minutes.
Meanwhile, in a medium bowl, sift together the flour, baking powder, baking soda, dry ginger, nutmeg, allspice, cinnamon, cloves and salt. Whisk to blend. Set aside.
In another bowl, whisk together the eggs, molasses and lemon juice.
Preheat the oven to 350 degrees F.
When the butter and sugar are integrated, lower the speed of the mixer and add the dry ingredients. Add the egg mixture and when blended, remove the bowl from the machine. Divide the cookie dough in half. Press the first half of the dough in between 2 sheets of waxed paper or plastic wrap and chill for 15 minutes. Repeat with the second half. This step will make it easier to finish rolling out the dough when it has chilled. It will also mean you only have half of the dough getting warm as you roll it.
Lightly flour a flat surface. Use a floured rolling pin to gently roll the first half of the dough about 1/2-inch thick. Lightly flour the cookie cutter(s) and cut the shapes, making as few scraps as possible. Use a metal spatula to gently transfer them, cookie by cookie, (the cookies should be similar size) to a baking sheet. Repeat with the other half of the dough and transfer them to another baking sheet. A note about crowding the tray(s): these particular cookies can spread a little. Leave room between the cookies. Better to use 3 baking sheets with fewer cookies than to crowd them on 2 trays. Bake until brown around the edges, 8 to 10 minutes.
Got scraps? Form the scraps into a ball, press it flat and chill in the refrigerator. These cookies may be a little more "tough" because the dough will have been worked a little more than the others.
Easy Orange Frosting:
1 cup powdered sugar
Finely grated zest of 1 orange
1 to 2 tablespoons freshly squeezed orange juice
1/2 teaspoon orange liqueur
1/4 teaspoon light corn syrup
In a medium bowl add all of the ingredients and whisk together to combine. If too thick in consistency, add a touch more orange juice or water to thin out.
- cold dough is key - less likely to stick to the rolling pin
other than that it was a pretty basic recipe. and yummy!
Sunday, December 13, 2009
FREE GAME!

So I've been couponing for about 4 months (Go ahead, make fun of me Lonnie and James!) and I usually count on sites such as Macomb Money Savers and Hip2Save to tell me the deals but today, ladies and gentlemen I discovered and matched up my very first deal!!!!!
Here we go -
Toys R Us has Connect 4 on sale for $7.99
They are offering a $3.00 rebate which brings the price to $4.00
Go here and print a $5.00 off Connect 4 coupon
Final price - FREE!
According to the fine print, the rebates are available at the stores!
Saturday, December 12, 2009
12 Days of Cookies - Day 6
The second batch of cookies that I made for Capri's Christmas party.
Citrus Trio Butter Dipping Cookies

Ingredients
1 cup unsalted butter, cool but not straight from the fridge
4 ounces cream cheese, cool but not straight from the fridge
1 cup sugar
1 teaspoon vanilla extract
1 3/4 cups all-purpose flour
1/4 teaspoon baking powder
Dash salt
Finely grated zest from 1 lime
Finely grated zest from 1 orange
Finely grated zest from 1 lemon
Directions
Preheat the oven to 350 degrees F.
Add the butter, cream cheese, sugar and vanilla to the bowl of a stand mixer. Beat on medium-high speed until creamy, about 1 minute.
In a separate bowl, whisk together the flour, baking powder and salt. On the lowest speed, gradually add the flour mixture into the butter mixture, just until blended. Divide the batter into 3 bowls, and gently stir in the different zests among the bowls, making 3 citrus flavored batters.
Scrape each batter into a pastry bag fitted with a 1/4-inch tip, or a sturdy plastic bag with the corner snipped off. Pipe 2-inch long strips, about 2 inches apart, on a cold unlined baking sheet. Bake for 12 to 14 minutes, or until golden brown. Repeat with the other batches.
Remove from the oven, and let cool on the baking sheet for a few minutes before removing with a spatula to cool completely on baking rack. Serve with tea or coffee, or just nibble...addictive!
Cook's Note: To butter cookie purists: these are also delicious without the zest!
Lessons Learned
1. The recipe has changed since I made these. Instead of the pastry bag, I rolled them out like a rope and sliced them into pieces rather than piping them. Your choice.
2. These would be amazing dipped in coffee!
3. Another kitchen gadget I came to love after this recipe - Microplane grater/zester!
12 Days of Cookies - Day 5
Every year Food Network releases their 12 Days of Cookies newsletter. Every year, I am crazy enough to make them - ALL of them. I have a big, 3 sided family and now being married adds more sides so we have a lot of family Christmases. Add in getting together with friends, work parties and now baby showers (YAY Alyce and Dave!) it means I have to come up with a lot of dishes to bring. I found myself stressing about it until last year. I made up all of the cookies ahead of time and whenever I had a party to attend I would just pull out my platter and load it up with various cookies - AND DONE! The glitch to that system was living in an apartment made it really hard to store dozens of a dozen types of cookies. This year, even though we are in a house, I haven't had an entire day to devote to baking so I'm making them 2 at a time. My parent's hosted their annual Capri Bakery Christmas party for all of their employees on December 6th and that was the kickoff for the holiday season. I didn't go in order with these cookies so if the days don't make sense, you know why.
Cinnamon Spiced Hot Chocolate Cookies
 Ingredients
1 cup all-purpose flour
1/2 cup plus 1 tablespoon unsweetened Mexican cocoa powder (or subsitute by adding 3/4 teaspoon ground cinnamon to unsweetened cocoa powder)
1/4 teaspoon baking soda
1/4 teaspoon salt
1/2 cup plus 1 tablespoon packed light brown sugar
1/2 cup plus 1 tablespoon granulated sugar
3 tablespoons sweet butter, at room temperature
3 tablespoons margarine
1/2 teaspoon ground cinnamon
Generous pinch ground black pepper
Generous pinch cayenne pepper
1 teaspoon vanilla extract
1 egg white
1/2 cup dulce de leche, optional
1/4 cup almonds, finely chopped, optional
Directions
Combine the flour, cocoa, baking soda, and salt in a medium bowl. Mix thoroughly with a whisk and set aside. Combine the sugars in a small bowl and mix well with your fingers pressing out any lumps. (Combine in a food processor if lumps are stubborn.)
In a medium mixing bowl, using a hand mixer, beat the butter and margarine until creamy. Add sugar mixture, cinnamon, peppers, and vanilla. Beat on high speed for about 1 minute. Beat in the egg white and until the mixture is smooth. Stop the mixer. Add the flour mixture, beating on the lowest speed, just until incorporated.
Gather the dough together with your hands and form it into a neat log, 9 to 10 inches long by 1 1/2 inches in diameter. Wrap in waxed paper or plastic wrap. Fold or twist ends of the paper without pinching or flatting the log. Refrigerate at least 45 minutes, or until needed.
Put the oven racks in the upper and lower third of the oven and preheat to 350 degrees F. Line baking sheets with parchment paper or aluminum foil.
Use a sharp knife to slice rounds of chilled dough, a scant 1/4-inch thick. Arrange the cookies, 1-inch apart, on the prepared baking sheets. Bake 12 to 14 minutes. Rotate the baking sheets from top to bottom and front to back about halfway through. Cookies will puff and crackle on top, and then begin to settle down slightly when done.
Remove the baking sheets from the oven and use a metal spatula to transfer the cookies to a wire rack to cool. Allow the cookies to cool completely before storing or stacking. Store in an airtight container up to 2 weeks, or freeze up to 2 months.
To spice things up, after the cookies are baked, let them cool on a wire rack, drizzle with dulce de leche and sprinkle chopped almonds on top.
Lessons Learned
I totally copied and pasted this recipe because I didn't feel like typing it out. Just putting that out there. However, here's what I learned when doing this.
1. It pays to have better tools! Last year, I was rocking dull knives and borrowed my mom's older stand mixer plus all my other stuff was college leftovers. Thanks to everyone who blessed us with amazing wedding gifts this past year, I have much better baking tools and it makes life easier! I am IN LOVE with my Kitchenaid and Nick was laughing at me as I talked to my knives and thanked them for staying so sharp.
2. Dulce de Leche - pretty much caramel.
3. These cookies were delish!
Subscribe to:
Posts (Atom)